
How to Make a Template for a Hair System That Fits Perfectly
Ordering a custom hair system requires a flawless blueprint to guarantee a natural look. Following a precise method on how to make a template for a hair system at home ensures your next order from Royal Hair fits the unique contours of your skull perfectly. Without an accurate 3D mold, even the best unit will wrinkle or lift.a hair system ensures that your next custom order from Royal Hair fits like a second skin.
What is a hair system template?
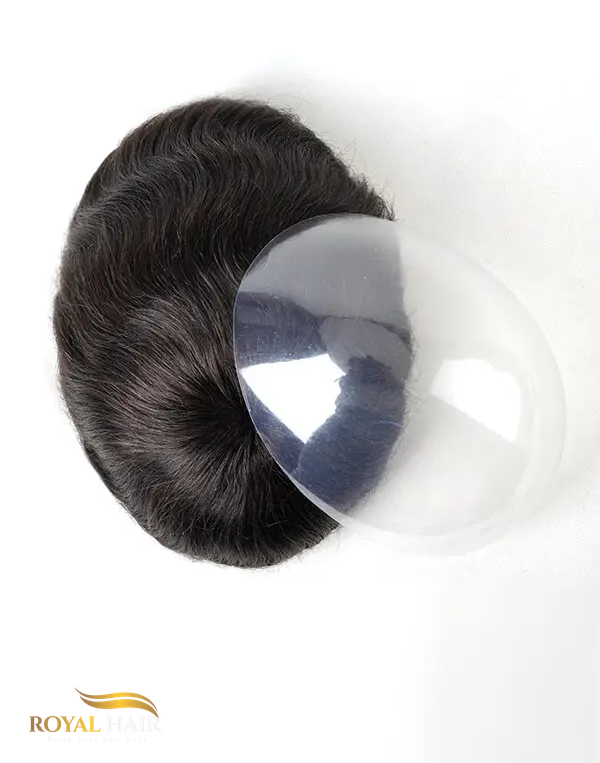
A hair system template is a precise, three-dimensional mold of your scalp’s balding or thinning area. Made using layers of clear plastic wrap and heavy-duty tape, this structural replica captures the exact curvature, length, and width of your head. Factories use this physical mold as a 3D blueprint to cut the polyurethane (poly) or lace base so that it matches your scalp’s unique shape flawlessly.
What is the purpose of making a hair system template?
Many assume that simple flat measurements (such as 8×10 inches) are enough to order a hairpiece. However, flat dimensions fail to account for the unique slopes and ridges of your skull. A custom template is necessary because it:
- Eliminates Base Wrinkling: A flat base forced onto a curved head will crease and create air pockets, leading to early lifting. A templated base lays perfectly flat.
- Dictates Accurate Hairline Placement: It maps exactly where your forehead ends and the hair system should begin, preventing an unnaturally low or high hairline.
- Secures Proper Directional Flow: It allows you to draw your exact crown location (the hair swirl) and preferred parting line directly onto the mold so the factory vents the hair correctly.
Tools and Materials You Need Before You Begin
Before you begin molding, gather these essential supplies on your vanity:
- Plastic Cling Wrap: Standard kitchen wrap to form the protective base layer.
- Clear Packing Tape / Scotch Tape: Heavy-duty transparent tape to add structural rigidity to the mold.
- Permanent Marker: A dark Sharpie to trace your perimeter boundaries and write directional notes.
- Cosmetic Makeup Pencil: A light-colored eyeliner pencil to map out your hairline on your skin before wrapping.
- Sharp Scissors: For trimming the excess plastic and tape neatly.
- Handheld Mirror: To check your work at the back of your head, or a trusted friend to assist you.
How to make a template for a custom hair system
Creating an accurate custom mold on your own requires patience and precise coordination, but it is completely doable with the right strategy. Follow this detailed, action-oriented breakdown to build your 3D system blueprint:
Step 1: Map your baseline directly on the skin
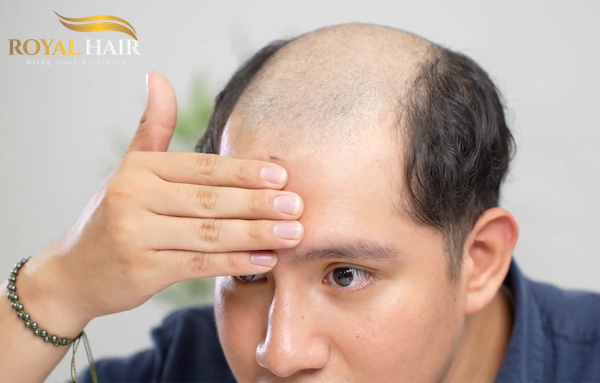
Before touching the plastic wrap, you need to map out your boundaries. Place three fingers flat on your forehead, with a fourth finger extending upward to mark where your natural hair used to end. To ensure perfect placement, lift your eyebrows heavily to reveal your natural forehead wrinkles—your front hairline marker must sit safely on or slightly above the highest wrinkle line to maintain a realistic facial balance.
Step 2: Trace the natural contour
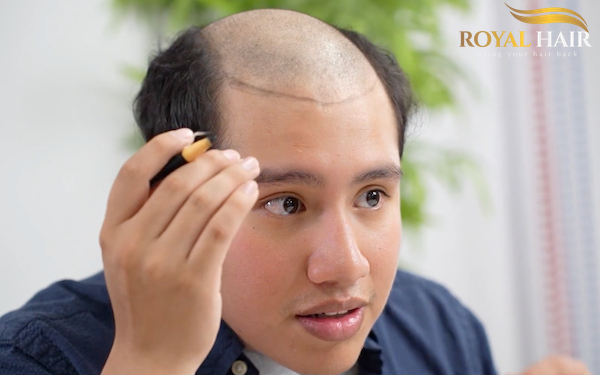
Using your China pen or marker, draw a smooth curve that follows the natural, organic shape of your hair loss zone. Avoid drawing harsh, completely straight lines, as they are incredibly difficult for the factory to cut and style naturally.
Step 3: Map out special poly-to-lace transitions (Optional)
If you are ordering a hybrid custom unit (such as a system with a delicate lace front welded to a durable polyurethane perimeter), draw a clear line parallel to your temple recession. This extra dimension tells the technicians exactly where the lace material should stop and where the poly material should begin.
Step 4: Prep and stretch the Saran wrap
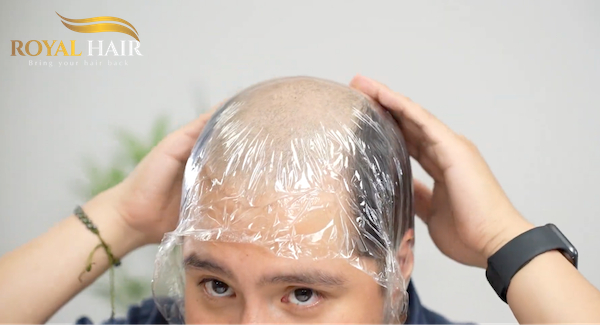
Cut a large piece of Saran wrap. Ensure the sheet is spacious enough to not only cover the entire crown of your head but also long enough to wrap securely around your neck to hold it in place. Lay it over your head, pull the edges firmly to stretch out any air pockets, and hold it taut against your scalp.
Step 5: Trace the baseline onto the wrap
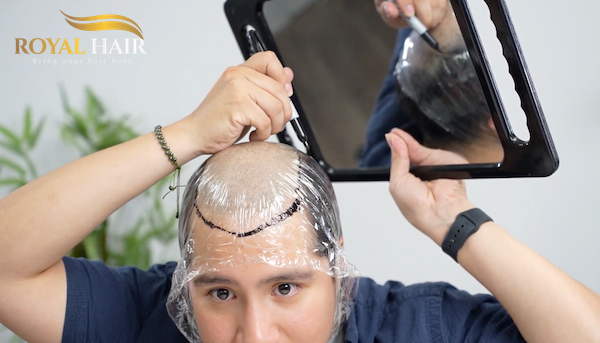
Look into the mirror; you will easily see the black marker lines you drew on your skin showing through the clear Saran wrap. Take your marker and trace exactly over those lines directly onto the plastic wrap. Mark a clear “F” at the front. If you are using a hybrid custom system (Lace front + Poly back), draw the parallel transition line at the temple recessions right now.
Step 6: Layer the structural tape
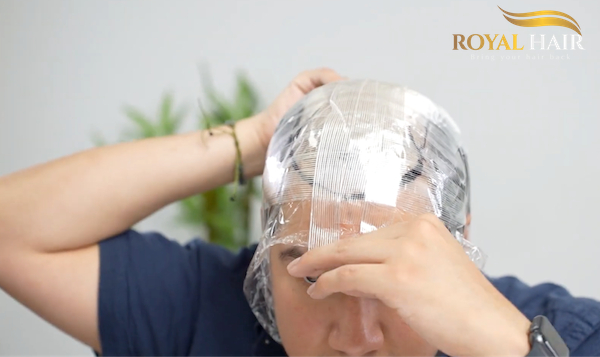
Grab your tape and begin applying custom strands directly over the marked Saran wrap covering your head. Build a rigid shell by cross-layering your strips: apply several strands perpendicular to your head, and then lock them down with a second layer of strands running parallel. This grid locks the shape of your head into the mold while keeping your marker lines and “F” label perfectly visible underneath.
Step 6: Remove the rigid shell
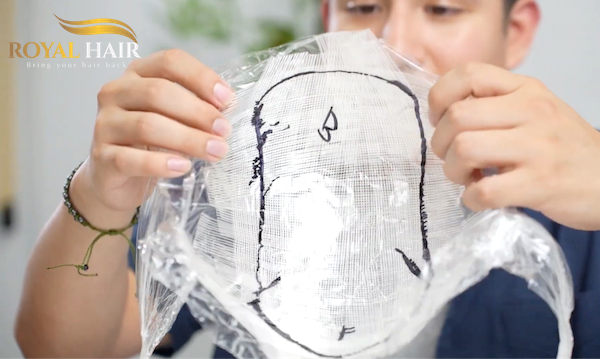
Untie or loosen the Saran wrap from around your neck. Gently slide the rigid, taped cap off your head. Thanks to the cross-taping method, the shell will permanently hold the exact three-dimensional contour of your skull.
Step 7: Cut with a half-inch safety tolerance
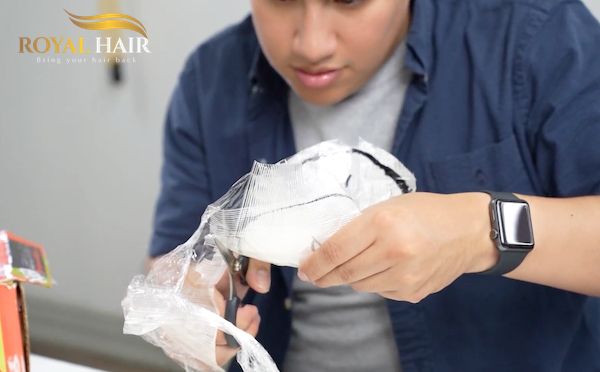
Grab a sharp pair of scissors to cut the mold out. Keeping your “Front” and “Back” orientations in mind, do not cut right on the marker line. Leave about a half-inch (0.5 inch) safety tolerance and cut slightly farther out. You can always make a template smaller, but you cannot make it grow back once the material is gone.
Step 8: Perform the final trim and fit check
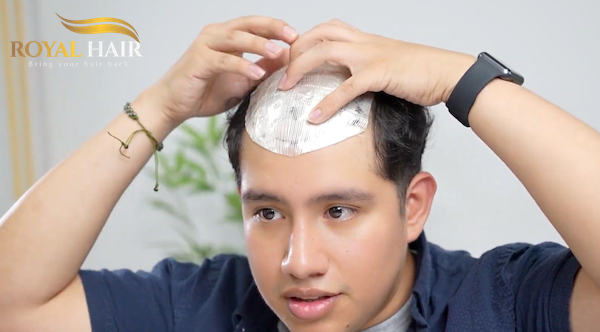
Place the oversized template back onto your head over your current haircut to see how it fits. Since it will still be a little too big, take your scissors and carefully perform a final trim right down to your exact hairline and perimeter lines until the template sits perfectly flush.
Step 9: Note the inversion rule for cutting
Once your template is finished, you can use it to cut your lace or skin systems at home. However, remember that if you place the template onto a model mannequin head to perform the cut, the dimensions will be in reverse (like a mirror image). You must invert the template (turn it inside out) when pinning it down to a model head so that the final cut aligns perfectly with your actual scalp.
What mistakes should you avoid during the hair system template process?
Even a small error during the molding process can cause your custom unit to fit poorly. Watch out for these frequent missteps:
- Allowing Wrinkles in the Cling Wrap: If the base plastic layer is loose or bunched up, the tape will lock those wrinkles into place, resulting in a template that is larger than your actual head.
- Using Too Few Tape Layers: If you only apply one or two quick layers of tape, the template will remain too soft. It will easily collapse or deform when packed into a shipping box, ruining the factory’s reference.
- Taping Over Long Natural Hair: If you have long hair on the sides or back, do not let it get trapped loosely under the plastic wrap. This adds artificial bulk, making the template’s perimeter wider than your true bald zone. Pin or slick down your natural hair completely flat before starting.
Useful tips for making a hair system template for custom orders
To ensure your custom mold arrives at the factory in pristine condition, keep these professional tips in mind:
- Use the correct tape: Never use paper masking tape, duct tape, or electrical tape. They expand, contract, or leave sticky residues that distort the dimensions. Stick to heavy-duty clear shipping or packing tape.
- Keep your expressions neutral: Avoid frowning, raising your eyebrows, or talking while tracing your front hairline. Facial movements stretch the skin and cause the hairline to be mapped inaccurately.
- Double-check the stiffness: When you squeeze the removed template gently in your hand, it should feel like a firm, structured cap. If it collapses easily or feels like soft plastic wrap, you did not use enough tape layers. Add another layer of horizontal tape before trimming.
Frequently Asked Questions
Can I make a hair system template by myself?
Yes, you can easily map out the front and sides by yourself using a mirror. However, tracing the back perimeter and crown accurately can be challenging. We highly recommend having a friend, family member, or local stylist help you tape and trace the back section to avoid errors.
What is the best tape to use for the template?
Clear, heavy-duty acrylic packing tape or high-quality transparent Scotch tape is the industry standard. It provides the perfect rigid barrier that holds its structural shape during international shipping without shrinking.
How can you check if your template is ready to send to the factory?
Place the trimmed template back onto your head. If it snaps onto your bald zone smoothly, stays flush against your skin without lifting at the edges, and doesn’t warp when you lift it off, it is accurate enough to send to your supplier.
Is it possible to use measurements rather than a physical mold?
You can use flat measurements (Length x Width) if your bald area is a perfect, standard oval and your head shape is completely average. However, if you have irregular hair loss patterns, sharp temple recessions, or a unique skull shape, a physical template is mandatory to avoid a poorly fitting unit.
When do you need to create a replacement template?
You only need to make a new template if your natural hair loss progresses further down the sides or back of your head. If your hair loss pattern remains stable, you can reuse the same template for multiple custom orders over several years.
Do you need a template for stock hair systems or just custom ones?
Templates are primarily built for custom orders. However, you can also use a physical template to cut down a large pre-made stock unit at home to ensure it perfectly matches your hair loss zone before installation.
Custom vs. stock hair systems: What is the main difference?
A stock system is pre-manufactured in standard sizes (like 8×10) with fixed densities and colors, requiring you to cut it down to fit. A custom hair system is built completely from scratch based on your physical template, allowing you to choose tailored hair densities, gray hair percentages, base materials, and exact color blends.
Can a local hair salon create the template for you?
Absolutely. Most professional hair replacement salons can create this mold for you during a consultation. You can then request the physical mold from them to use for your independent custom orders.
Do you need to provide anything other than the template to your supplier?
Yes. Along with the template, you should send a small physical lock of your own natural hair (taken from the side or back) so the factory can match the exact color, texture, and wave pattern.
How long after sending the mold will your custom hair system arrive?
Because a custom unit is hand-tied strand by strand onto your specific mold blueprint, production typically takes between 8 to 12 weeks from the day the factory receives your physical template.
Is this same template method suitable for children or full scalp alopecia?
Yes. For full scalp alopecia or total hair loss, the same plastic wrap and tape method is used. However, instead of mapping a small thinning zone, you will mold the entire dome of the skull from the front hairline all the way down to the nape of the neck to create a full wig template.
Conclusion
Taking the time to build a precise, rigid template is the most critical step to ensuring your custom hair system investment pays off. By capturing every unique curve of your head, you eliminate the guesswork for the factory and guarantee a natural look.
If you are ready to experience a perfectly fitted unit, create your custom mold today and send it to the design experts at Royal Hair to begin building your premium, undetectable hair system.
